Monday, 12 October 2015

3D Model Rigging 06

Week 4 - Day 2

Faces. What? It's so weird. Like, I'm not conscious abut the way I smile or whatever. Did you know that it's really friggin' weird to frown with the corner of your lips turned down? I'd frown with my eyebrows and a curl of my lips upwards  if I'm kind of grossed out but not...down unless I'm exaggerating? Meh.

Faces are weird.

(No, your face is weird.)

Wow...no...

Here's another awkward smile but with her cheeks up this time. Yay...


And another unimpressed look. Like, she can't believe I'm her creator. (Booo...) There's a sort of "what the eff" look to her. (Eyebrows are awesomely emotive.)


Now for the demo rig!! And I'll be almost finished in time for the hand-in on Monday!!

...

...

We shall never speak of this day again. My model broke. And I broke. It was sad. (Understatement.)

Piece of @*^%
...You will find me in a pool of tears under my desk...

Sunday, 11 October 2015

3D Model Rigging 05

Week 4 - Day 1

We're doing more blend shapes, yay...!

I can make her smile creepily...


I can make her to a derpy blink...(Much blink, such Asian.) [This is not meant as an offensive slur; I'm Asian myself...]


I can make her frown and look sad...


Or vaguely unimpressed...or somewhat disgusted?


Man, she looks horrifying. I'll need to redo the smile because I forgot about them cheeks...And I might also consider redoing the blinks but it's gonna happen so quickly that it might not even matter in the end? We'll see...

THIS IS MY INTEGRITY AT STAKE, HERE!!

...

Cheers...

Tuesday, 6 October 2015

3D Model Rigging 04

Week 3 - Day 1 to 3

It's been a very hectic week...with a lot of information overload. I don't even know where to start blogging but I can tell you there's been a lot of joint constraining. There was one point where I did the wrong thing because all of my instructions were wrong which equaled to about 4 hours of work null and void...like, at which point do you select the joint first or the constrain first before applying stuff to it? There was also the whole parent constraint which confused me because I thought I was supposed to do that for every joint but it turned out I only needed to do it once?? I don't know the reasoning behind it; I just do it.

It's ridiculous. Let me show you...

Joint constaints, yay...
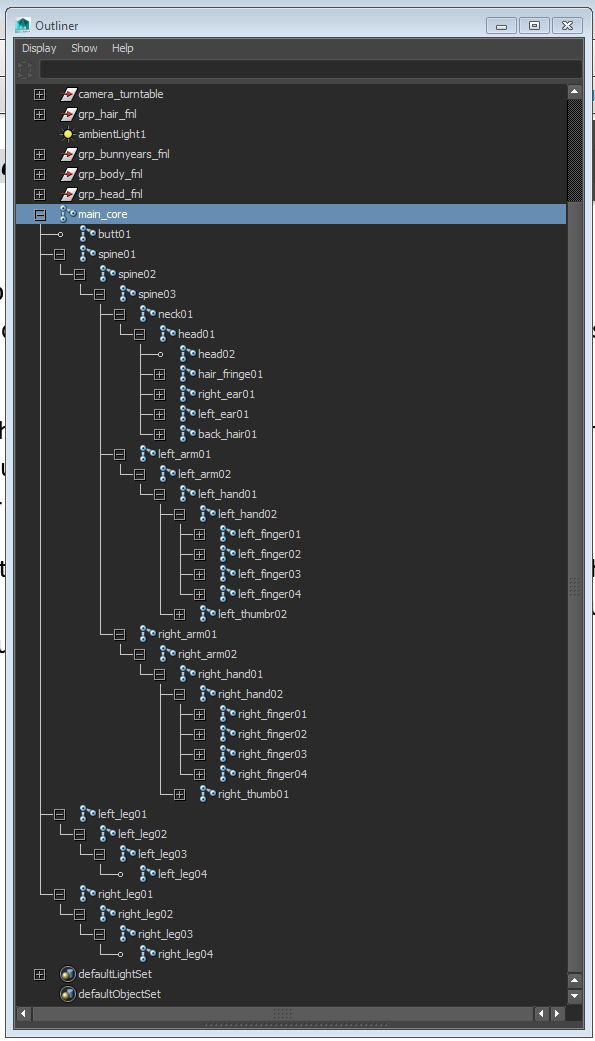
The fingers were horrendous because all of the rotation for the joints were really bad but at this point, I really just can't...do...anything more about it because I just want it DONE. I also need to clean up my outliner because it is MESSED UP.

Much ugh...very die...
I should probably group them and rename them properly but I should also probably ask Keat if that would mess up the dummies up top or the constraints inside the constraints...(!!?!??!)

There was also an IK Rig involved where the legs are so that when I move it around the knee will always point to a specific area of my choosing...

It looks a real mess, basically.

I'll probably be spending the rest of the week doing set driven keys, that is, if we don't end up with more stuff we need to do for the model. (Please, Keat, have pity on us poor souls!!)


P.S - I want to go home and play guildwars, please...

Tuesday, 29 September 2015

3D Model Rigging 03

Week 2 - Day 3

Yesterday was a total blur of information overload. I can't recall much, which is a bit worrying...Anyway, we did some weight-painting yesterday, which turned out to be a bit moot later on when we discovered that we had to do some "blend shapes" which pretty much requires a total detachment of the skin from the joints (I could be wrong?). In any case, the weight painting I did yesterday is GONE, which means I'll have to redo that after I'm done with the blend shapes, but still, UGHHSDJKFHSKDJFHSKDHFKJSDHFJKSDHF.

Practice, practice, PRACTICE. (I don't wike it.)

But you gotta do what you gotta do.

How do I explain blend shapes? To be honest, I haven't got the slightest clue how to go about that! I can, more or less, understand the concept of it and actually do it on my own models but to actually go into the reasoning of HOW and WHY...well, you won't find too much of that here...

What I CAN do, however, is go through the steps in hopes that it'll drill into my brain so I can do it again on a different model if need be...

...

Such torture...

...

OKAY! Blend shapes. I went back to a previously saved increment and managed to find one where the mesh and the joints weren't connected together yet and did a copy of the body geo.

Blend Shapes!!
As you can see, I've got a master of the body geo; this is where the magic happens. The duplicate of the master is the dummy and from the dummy we get duplicates again to make it into whatever I want. In this case, I made them into fat and skinny versions of the master. I'm not actually going to use them - it's just nice to know I can edit them later if need be. I hid the dummies in a separate layer so they won't show up on the main screen. Layers are good...

Master Controls!
 I forgot to name them properly when I made the blend shapes...OPPS. But I didn't repeat it with the geos for the head, ears, hands, etc...so it's all good. The master key should always be at max. I'm not sure why, I forgot most of the reasons behind it...(Blugghghhsjsshka...)

Outliner Galore...
I'm, uh...not sure what to do with my outliner. I'll need to ask Keat on help for how to clean them up - whether I can put them all in separately named groups or to just leave it as is? As you can see, I combined the separate pieces of the bunny ears, hair, eyes, etc together for easier duplication. I'm not sure if this was a good idea or not...but I could always go back a couple of saved files before I did this so that's all good, too...I've got 50 saved increments and counting...

(So, please, don't let me be wrong...)

Stay tuned for the next epic fail.

Sunday, 27 September 2015

3D Model Rigging 02

Week 2 - Day 1

So...I forgot to include the hand joints last time I made the skeleton rig. After I had another look at the photoshop file and some consultation with Keat, I ended up with this...

HAND JOINTS GALORE!
Up close and personal..
I'm not entirely 100% sure I got it right...but, I think it works well enough for what I need for animation. Let's hope it actually works. XD

Here's my outliner!! It's SO MESSY!!!

JOINTS OVERLOAD!!
I think the facial rigging is next...that's going to be FUN...

...

...

I was wrong. We're doing weight painting instead and let me tell you something. IT SUCKS!!!!


Thursday, 24 September 2015

3D Model Rigging 01

(Holiday? What is this holiday that you speak of? I know not.)

Week 1 - Day 1 to 4 (Because I completely forgot about blogging until just now?)

This week, our first challenger greeted us with a fist to the face. Not literally, of course. I'm talking metaphorically. It's name is Rigger and it is kicking my metaphorical butt. Keat started us off easy with a demonstration using the cake model where it's a mostly rigid prop and where the only thing that'll be moving at all is the lid where Emelyn will be popping out of. I'm actually not too sure how many joints I'll be needing for it? Whether it's just the two joints on the lids for the up and down motion or whether it needs to be connected to the body as well? I'll need to ask Keat on Monday but I've got a feeling it'll be the latter...which is no big deal because it's hardly a complicated piece of rigging to have in a prop.

Cake Rigging
BUT THE ACTUAL CHARACTER MODEL!! Now, THAT is a different story...

Keat printed out our models so we could draw where we think the joints ought to go in the model so I thought, "oh, this'll be easy". Oh, how I was wrong...so, so, so wrong. 

What I think would happen...
What actually happened...
So, anyway, this rigging/jointing thing is...complicated? Less so than UV texturing and 3D modelling but still a right piece of work. The minimal amount of joints I thought would work in my photoshop trial will NOT ACTUALLY WORK because there's just not enough information to work from. There were the spinal joints to consider, which joint is connected to which to control the bunny ears, the long hair, the long fringe in the front, the extra joint for the butt because why not? And then the arms connected to the shoulder connected to the spine in the middle of the body but not actually from the next like I thought it would - SO MANY PIECES. You can compare my first foray into what I assumed will work and what it actually turned out to be. Whoa, right??

NOTE - Always label and do spring-cleaning, but whatever you do, DO NOT GET RID OF THAT SMOOTH POLYGON OPTION, because you'll always want to be working from a low-poly resolution just to make things easier for yourself. Keat said that you COULD work from a high-poly model but there's a lot of extra edge-loops and a lot of extra information that's...redundant? Unnecessary? Needlessly complicated? Meh...

My second attempt at modelling is a lot better because I kind of know what not to do and I'm actually doing the labeling and cleaning along the way...I'll let you know how well that works when I'm done...and you can laugh as I crash and burn. Yay!

Tuesday, 1 September 2015

3D Prop UV Texturing 02

Week 8 - Day 3

I was going to start making my Steve Rogers character model today but Keat told me to make a coffin and then Mikayla told me to stick Steve Rogers in it. WHAAAT!!??

Anyway, I made the coffin (without Steve Rogers in it). Nice and simple, so yay!!

It's empty, I swear!
Here's the video turntable for it. Check it out...


I'm moving on. Or else I'll be asked to start making those pot-plants that go with the scene, too. DX

BYE!