Wednesday 11 November 2015

3D Character Animation 08

NAME: Joanne Teo (FAS00001OH)
PROJECT: Rigging & Animation Project (Summative)
DATE: 11/11/2015
CLASS: BAR06 3D Foundations

RATIONALE
Parodies are not a new invention but since the introduction of social media they have grown exponentially in popularity; there will hardly ever be a day without some mention of a meme that have become so integral in today’s pop culture conversations. That said, it’s easy to reimagine scenes from one medium to fit into the genre of another which is where Emelyn, a bright but struggling student trying to make ends meet by picking up the odd job here and there, comes in.

My development process included brainstorming different scenes to fit a genre shift and it wasn’t long before I settled for the iconic alien popping out of a person’s stomach and twisted it from a sci-fi horror into a dark comedy instead. I went through different ideas and peer consultations before settling on a girl jumping out of a cake prop, mostly due to the enthusiastic replies of my classmates.

I wasn’t aiming for realism when I designed Emelyn and was intent on using flat colours without any textures involved for a “doll” look but Keat suggested a texture for her clothes, skin, hair and even her bunny ears. UV texturing became a problem but the end result was rewarding although it did lend a bit of an uncanny feeling to the model which took a couple of days to warm up and get used to.

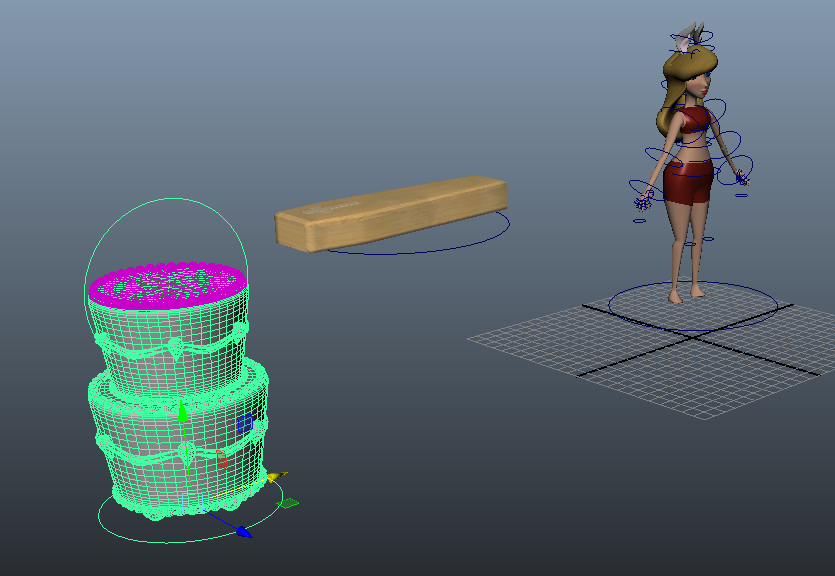
The coffin prop was a last minute addition as well as the cross on the wall, the former of which was a request from Keat. They added an extra appeal to the scene rather than the use of a flat 2D background. The coffin was originally roughly the same size as Emelyn but it kept disappearing behind the cake prop so I enlarged it until it was visible throughout the scene. It would be large enough to fit two Emelyn’s in there but in this case, artistic licensing was used to make the shots look nicer. I didn’t have enough time to include two flower pots so they were disregarded in the end for a higher priority.

I had originally planned to keep the animation as close to the storyboard as possible but consultations with Keat showed me a better way to go about animating certain scenes. I’d previously meant for the cake to shake before Emelyn jumps out of it but since the cake prop has a control for opening and closing, it looked better to make the lid rattle than to move the whole prop. This gave the scene a more appealing look and it allowed me to use the control on the cake to its full potential.

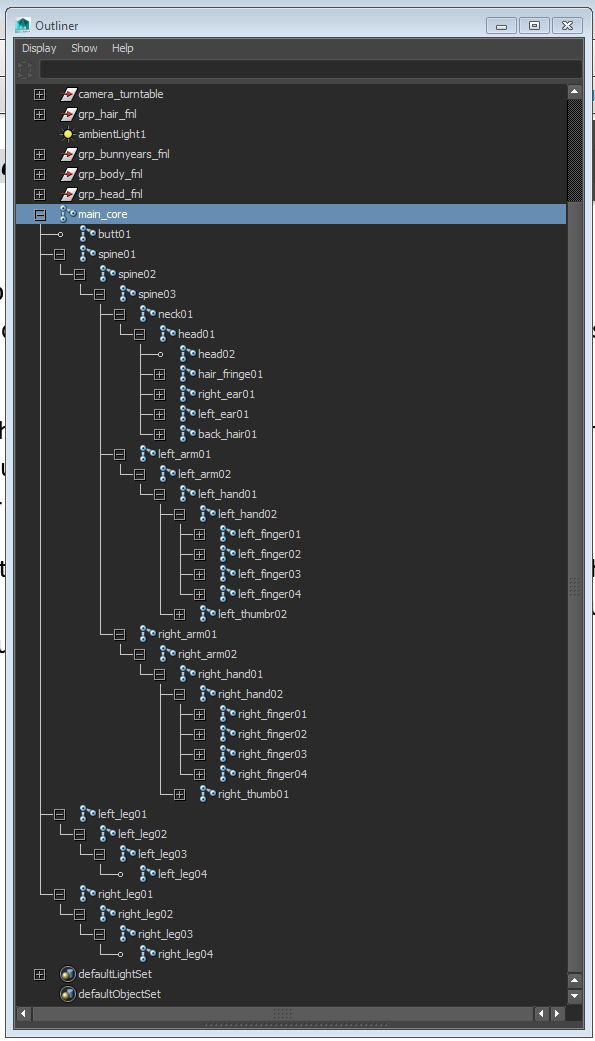
Her animation requires her to fling her arms out after she pops out of the cake and the original idea had her throw her arms upwards but I wanted her to spread her arms out horizontally in line to the cross on the wall behind her instead. I attempted this but the animation didn’t feel or look quite as appealing as what was drawn in the storyboard, and I also felt it might cross the line towards insensitive instead, considering that the setting is in a funeral home. This is the case where the original beats a different attempt. There was also a jump and settle of her body after she appears out of the cake which was a suggestion made by a peer. It gave her the look of stretching and bending her knees despite that the IK rigs on her legs were not used.

Lighting had its own difficulties to deal with but the inclusion of it made me reconsider the application of certain materials on the model. I changed the blinn texture meant to emulate silk and turned it into a lambert instead due to the plastic-look and unappealing way it shone under the spotlights. The matte appearance fitted better in the overall scene.

In regards to audio done in After Effects, I was only going to use the original audio from the chestburster scene but decided the silence leading up and after that felt too unnatural so I decided to use audio from freesounds.org to fill in the quiet parts with a murmur at the beginning followed the a rattle for the cake lid, the original audio mixed with a gasp and an outraged mumbling in the background. All in alI, I’m very happy with how the entire animation turned out in the end.

3D Character Animation 07

Week 8 Day 4

I've done my editing! That is to say, I've added some audio to go with the video. It was pretty awkward at the beginning without any sound until we hit the chestburster audio but it was easily fixed with some crowd murmuring in the background mixed in with a gasp here and an outraged chatter there. Woohoo~ After Effects crashed every time I tried to render out a RAM version which sucked because I had to second-guess a lot of where the rattle had to go and I think I missed one little bit with the timing but the constant crashing kind of...got me frustrated. I fixed it as best as I could and on the whole, it's a pretty minor detail to pick up on unless you're like me and kind of pedantic and you know where to listen...Huehehehe...

My next post will include a rationale for this entire venture. My thanks to you for reading and keeping up with me on this 3D journey, and also my thanks to my classmates for their encouragements and their help, my thanks to freesound.org as well and also to Keat for putting up with my whining and complaining and my crying.

Yes, I was totally pathetic but the laughs I've had along the way have been pretty worth it. (I'm going to erase my breakdown in the middle of the classroom...banish it from my thoughts...FOREVER...)

<3


Monday 9 November 2015

3D Character Animation 06

Week 8 Day 2

IT'S THE FINAL COUNTDOOOOWWWWNNNN!!!

So, I started doing some lighting yesterday...and total, I've got 5 light sources. 1x volume light and 4x spotlights. I originally only had 2 spot lights pointing at the cake but then I forgot about her popping out of said cake and this was what those two spotlights made her look like after rendering.

Can you hear it? MY HORROR. Like, what the actual eff.
This is better with the addition of twp extra spotlights but the blinn material I gave her looks horrible! SUCH HORRIBLE. Makes her look plasticky...
So I changed it into a lambert instead. Yay~
I almost changed the material on her eyes as well but the shine of it looks good - makes it look like she's on the verge of tears of ABSOLUTE DESPAIR AND EMBARRASSMENT AND SHAME. I like it.

Okay...moving onto...alpha channels. DX I AM THE ALPHA.

...

...

After talking with Keat I found out I don't really need to render out the scene into three separate pieces. PHEW! That's easier for me. I'm happy with the overall look of it and I wasn't even sure what I could do with them in After Effects anyway...

Now...to find me some free sound!! I'm thinking of a quiet murmuring for the background, people gasping, and the original audio from the movie file. This is gonna be cray.

Wednesday 4 November 2015

3D Character Animation 06

Week 7 - Day 4

So...I managed to, more or less, get the animation to how I want it, which means...I get to move onto lighting, compositing and rendering for next week!! We're coming to the final round and I will WIN. I WILL BE THE CHAMPION!!!

(And cry while I'm at it, but whatever, I'll still win.)

...

I've already made the necessary changes so if all goes well I could be finished as early as Tuesday and spend the last two days to refine it before the final submission on Thursday.

It's not actually due on Thursday but I like to give myself early deadlines (and unneeded stress) so if I ever come across a particular snag, I can fix it before it's due. Woohoo~

I'm not too fussed about the weirdness of her smile, mostly because I can't figure out which vertices is making her chin look like that and trust me when I say I've tried fixing it to the best of my abilities. This is as good as it'll get. It's very, very, extremely likely the chin is behaving that way because the two face geos are aligned one on top of the other and they're affecting each other in a bad way. Ain't good, man, but meh. I'll know what not to try doing next time and possibly either try a different method or just do it the hard way instead.

...

P.S - I bought some ice cream. It's actually not ice cream? It's more like...crunchy shaved ice with pieces of red bean and mini mochi pieces. Uh...it's not good, man. I am not buying it again.

You know how you buy ice cream and you eat it within...let's say, 5 minutes because that's pretty much the optimal level of consumption but this cold treat...I've been eating it for over half an hour. It's that bad, and that unappetizing. Now, you might be asking, why don't you just throw it away? Good question. I don't know why. It just didn't occur to me. Maybe because I'm slow, or maybe because I'm not a fan of wasting food. Oh well.

P.P.S - (While looking away from the screen and keyboard...) jerwin is so weird, i don't evem know what's going om/ I could be typin g this all wrong.

Monday 2 November 2015

3D Character Animation 05

Week 7 - Day 2

...

Where has the last 4 weeks gone? I don't even know. I sure as heck ain't hiding it in my pockets, bro.

So, Keat gave me some more advice on camera movements, like how one shot had too long a pause and how the rattle of the cake lid should lead up to the POP rather than just abruptly stop. I mean, IN HINDSIGHT, this makes sense, but only in hindsight because I sure as heck didn't think about it. You can call me lazy but it's probably a combination of TOO MUCH STUFF ON MY PLATE and lack of foresight, sooooooo...

I edited my frowny eyebrows so they're a bit lower and more noticeable and less...hiding in the hairline. Why did I make her hair so big and poofy? I regret. Much regret. I'm also trying to figure out the blendshape to make her mouth bigger. I would show you an image but I didn't think about it and to be honest...it's pretty friggin' horrifying. X_X I mean, I won't subject you to that, man. I ain't cruel.

So, camera movements down. 1 change in blendshape done and another one to go. Plus!! I'll need to change the way Emelyn pops out of the cake to add a contrast of small to LARGE. Will probably get around to it tomorrow.

On a plus side, and totally irrelevant to 3D, I finished my comparative analysis essay! HUZZAH! I dread seeing how much of it I'll have to fix when I get the first draft back but ugh, needs must, and I wanna pass...

I WANNA PASS, DANG IT!

...

Here's a preview of a later attempt at making Emelyn smile...

Such creepy. Much fearsome.
It's...horrible looking from a distance but less creepy, so that's okay...
I might...try and refine it tomorrow? It depends on how much torture I'm willing to put myself through...

...

We shall see...

...

P.S - When Captain America throws his mighty shield. All those who chose to oppose his shield must yield!!


Thursday 29 October 2015

3D Character Animation 04

Week 6 - Day 4

I added two image planes to act as the wall for the background. It's nothing fancy since I doubt it'll be marked on but at least it's not an infinite canvas so that's all good. I also copied over the cross from the coffin and put that in the middle of the wall because, otherwise, it looks super empty. I mean, I don't need it...but it's nice to have something there. You know, just for the sake of aesthetics. I gave the coffin a booster, too, made it bigger so it's not completely hidden behind the cake. It was originally the same size as Emelyn, maybe slightly bigger just because I wanted it to be as authentic looking as possible, but it's now easily twice the size and could probably fit two of her in it...but hey, anything to make the scene look good, right?

The new scene!
So, previously, you couldn't see the coffin or the cross, mostly because the cross is a last minute addition and the coffin only just recently received a free up-size otherwise it would've just disappeared in the scene. Not literally, but it was too small to be seen behind the enormity of the cake.

This is what it now looks like from the new playblast.

Thank goodness for the scale tool.
Keat also gave me some advice on how to improve the scene outside of what my storyboard dictated. I was trying to be as loyal to it as possible but, hey, what's the point of doing test-runs if not to make it better, right?

So, there's a rattle scene now. Since the cake lid now has a control, WHY NOT USE IT?? Keat told me to give it a side camera view and show the lid shaking rather than the whole cake moving. I have to say, THIS IS A MUCH BETTER IDEA!! I'm not too fussed about this so it's all good. I also got rid of the pan because the new camera view already served the purpose of introducing a new shot. Woohoo~~

This is me done for the week. Next time, I'll be refining my animation; make it BETTER, and tackling composition and lighting...

...

Wish me luck!!

P.S - I don't know why sometimes Maya lets you see the textures and sometimes it just doesn't. Maya is totally weird; never does what you want and chooses the most inconvenient moments to be totally useless. Thanks, Maya; you're awesome...

P.P.S - Bang, bang. bang!

Monday 26 October 2015

3D Character Animation 03

Week 6 - Day 1

TWO MORE WEEKS TO GO BEFORE THE END OF THE YEAR! WHAT, WHAT, WHAT?!??! I am simultaneously stressed as heck and relieved that it's almost over but...but, but, but...there's still so much to do?!? I mean, there's just the animating and figuring out the timing of everything left but UGH...

There's also the background and whether or not I'll do it all in 3D, entirely in simple shapes or...just go without because it's not the main focal point but...but, but, but...I don't know. -sobs-

So, last week we did some shot staging? Which, I think, was kind of like getting your shots to look exactly, or close enough to your storyboard? I think that went...fairly well. Or at least well enough that I didn't end up screwing something up and was reduced to another puddle of tears, grief and misery. This week is step blocking and I think that's more to do with timing and figuring out your keyframes to the best look. I'm not sure how well that'll go but fingers crossed that everything goes according to plan. My timing is horribly slow at the moment where she pops out of the cake but a bit of tweaking here and there ought to fix that.

Ought to...

...

I asked Mikayla for some tips on the timing of Emelyn's popping out of the cake and she told me to add a bit of exaggeration with her coming out and then settling back down again. That's some top advice, bro. She also helped me with the timing which is also pretty choice. I think I've got that part down pat. Woohoo~!

Some shot staging of Emelyn popping out of the cake. Complete with resolution gate!!
Next...uh...probably the facial expressions...although I'll probably come back to this tomorrow and see more things to fix. Nothing like a critically fresh set of eyes first thing in the morning. There will be a lot of moaning over the state of my animation.

(I sincerely miss 2D...I should try and draw some more and not limit it to just one a day...)


Monday 19 October 2015

3D Character Animation 02

Week 5 - Day 2

Inherit transforms!! Are only good if you select each geo as opposed to all of it! This is what happened to mine...

Honey, I shrunk the rig!!
...I don't know how to explain this.

...

Moving along, now.

A problem I faced earlier was that the cake pieces would not move TOGETHER - the lid refused to move with the base of the cake and that was pretty much because I forgot about a control-all nurb so they moved as a single unit as opposed to three separate pieces. PHEW. That fixed, I did the same thing with the coffin even though it ought to be good enough as just a group but meh. This is what the scene currently looks like.

It also helps that the control-all allows me to resize the cake together rather than fiddling around with different pieces and estimating where each piece goes...yay...


I reckon I could probably start with shot staging tomorrow?? Although I don't really have a clue what that is? I guess we'll see?

...

P.S - I don't know where Mikayla is...

Sunday 18 October 2015

3D Character Animation 01

Week 5 - Day 1

Drum roll, please!!! We now get to the actual part of character animation!! Remember that storyboard I did way back when? In the beginning of August?? It's now mid October and we're coming to a close to our final term with just 3 more weeks to go. OH. MAH. GAH.

I'm feeling so bad...(but that might be from lunch...?)

Anyway, I need to put the two props (coffin and cake) together onto the same file as Emelyn. I'm hoping it won't overload Maya but I predict a lot of crashes in the future...

Also, coffin and cake?? I almost wrote COFFEE and cake but this is morbid in a weird sense. Your eyes doth not deceive you! Don't overthink it.

Here is Emelyn in the same scene as the cake. It's GREEN!! Like it belongs to something in Dr. Seuss' books. Would you like a slice here or there? I would not like them anywhere...

I enlarged the cake to fit the width of her hips but I might make it bigger again anyway...
I'm not sure how to go about shot staging but there's no better way to find out other than to JUST DO IT. So, do it, I will.

I also added the coffin into the scene next to the cake and resized to be able to fit Emelyn. BUT SHE'S NOT THE ONE GOING INSIDE OF IT, that'll be horrible.

The coffin is roughly about the same size as Emelyn.
But I don't know why the coffin and Emelyn have retained their UV colors and textures but the cake is GREEN. Why is this so??? It's horrible. DX

Keeeeeaaaat, help meeeeeeee...

...


I got rid of the green by reassigning a new material over it. I wasn't able to get the original colors I wanted back but at this point it doesn't really matter. I need to prioritize the actual model over the prop so a base lambert will just have to do~! I also moved the cake so that it stood on the grid as opposed to being in the middle of it, but now it just means that Emelyn is stuck in the middle but I'll just have to add keys so she's moving around the cake rather than through it. Animation can only forgive so much and stupidity is not one of them. <3

...

Also, I have a feeling that the IK rig on the legs aren't going to be useful so I might have to do contraints for them like I did with the arms. That might work a little bit better with bend of her knees...

BUT! I might not even have to use them in the end? We'd hardly see her legs during the entire animation so it might just be okay. (Although my integrity might demand that I do better, which I will if time is more lenient towards me.)

Tuesday 13 October 2015

3D Model Rigging 07

Week 4 - Day 3 and 4

Keat is a maya pro. If not for him, I will still be under my desk in a pool of my own tears.

But my model broke again at around 3pm. I did not crawl under my desk this time. Only because I know it's fixable and not the end of my academic world.

Oh, mah, gah. Never again, please...

I need to redo my set driven keys...

UGH!!!

...

...

...

My model broke a total of three times, but I wasn't reduced to another puddle of tears the second or third time around. I don't think I'd ever let myself live it down if it were true but the shame of it's still definitely not going away anytime soon.

I had to redo my set driven keys three times as well because...well, let's just say that I was stupid and wrong and I should've listened or noticed sooner that I was missing an extra constraint for each of the fingers (not including the thumbs) to make the finger rolls a lot more natural looking. It's not perfect, but at this stage, I will happily sacrifice aesthetic appeal over function.

THIS IS DUE ON MONDAY, I AIN'T GOT TIME FOR THIS FIDDLY STUFF.

...

Monday 12 October 2015

3D Model Rigging 06

Week 4 - Day 2

Faces. What? It's so weird. Like, I'm not conscious abut the way I smile or whatever. Did you know that it's really friggin' weird to frown with the corner of your lips turned down? I'd frown with my eyebrows and a curl of my lips upwards  if I'm kind of grossed out but not...down unless I'm exaggerating? Meh.

Faces are weird.

(No, your face is weird.)

Wow...no...

Here's another awkward smile but with her cheeks up this time. Yay...


And another unimpressed look. Like, she can't believe I'm her creator. (Booo...) There's a sort of "what the eff" look to her. (Eyebrows are awesomely emotive.)


Now for the demo rig!! And I'll be almost finished in time for the hand-in on Monday!!

...

...

We shall never speak of this day again. My model broke. And I broke. It was sad. (Understatement.)

Piece of @*^%
...You will find me in a pool of tears under my desk...

Sunday 11 October 2015

3D Model Rigging 05

Week 4 - Day 1

We're doing more blend shapes, yay...!

I can make her smile creepily...


I can make her to a derpy blink...(Much blink, such Asian.) [This is not meant as an offensive slur; I'm Asian myself...]


I can make her frown and look sad...


Or vaguely unimpressed...or somewhat disgusted?


Man, she looks horrifying. I'll need to redo the smile because I forgot about them cheeks...And I might also consider redoing the blinks but it's gonna happen so quickly that it might not even matter in the end? We'll see...

THIS IS MY INTEGRITY AT STAKE, HERE!!

...

Cheers...

Tuesday 6 October 2015

3D Model Rigging 04

Week 3 - Day 1 to 3

It's been a very hectic week...with a lot of information overload. I don't even know where to start blogging but I can tell you there's been a lot of joint constraining. There was one point where I did the wrong thing because all of my instructions were wrong which equaled to about 4 hours of work null and void...like, at which point do you select the joint first or the constrain first before applying stuff to it? There was also the whole parent constraint which confused me because I thought I was supposed to do that for every joint but it turned out I only needed to do it once?? I don't know the reasoning behind it; I just do it.

It's ridiculous. Let me show you...

Joint constaints, yay...
The fingers were horrendous because all of the rotation for the joints were really bad but at this point, I really just can't...do...anything more about it because I just want it DONE. I also need to clean up my outliner because it is MESSED UP.

Much ugh...very die...
I should probably group them and rename them properly but I should also probably ask Keat if that would mess up the dummies up top or the constraints inside the constraints...(!!?!??!)

There was also an IK Rig involved where the legs are so that when I move it around the knee will always point to a specific area of my choosing...

It looks a real mess, basically.

I'll probably be spending the rest of the week doing set driven keys, that is, if we don't end up with more stuff we need to do for the model. (Please, Keat, have pity on us poor souls!!)


P.S - I want to go home and play guildwars, please...

Tuesday 29 September 2015

3D Model Rigging 03

Week 2 - Day 3

Yesterday was a total blur of information overload. I can't recall much, which is a bit worrying...Anyway, we did some weight-painting yesterday, which turned out to be a bit moot later on when we discovered that we had to do some "blend shapes" which pretty much requires a total detachment of the skin from the joints (I could be wrong?). In any case, the weight painting I did yesterday is GONE, which means I'll have to redo that after I'm done with the blend shapes, but still, UGHHSDJKFHSKDJFHSKDHFKJSDHFJKSDHF.

Practice, practice, PRACTICE. (I don't wike it.)

But you gotta do what you gotta do.

How do I explain blend shapes? To be honest, I haven't got the slightest clue how to go about that! I can, more or less, understand the concept of it and actually do it on my own models but to actually go into the reasoning of HOW and WHY...well, you won't find too much of that here...

What I CAN do, however, is go through the steps in hopes that it'll drill into my brain so I can do it again on a different model if need be...

...

Such torture...

...

OKAY! Blend shapes. I went back to a previously saved increment and managed to find one where the mesh and the joints weren't connected together yet and did a copy of the body geo.

Blend Shapes!!
As you can see, I've got a master of the body geo; this is where the magic happens. The duplicate of the master is the dummy and from the dummy we get duplicates again to make it into whatever I want. In this case, I made them into fat and skinny versions of the master. I'm not actually going to use them - it's just nice to know I can edit them later if need be. I hid the dummies in a separate layer so they won't show up on the main screen. Layers are good...

Master Controls!
 I forgot to name them properly when I made the blend shapes...OPPS. But I didn't repeat it with the geos for the head, ears, hands, etc...so it's all good. The master key should always be at max. I'm not sure why, I forgot most of the reasons behind it...(Blugghghhsjsshka...)

Outliner Galore...
I'm, uh...not sure what to do with my outliner. I'll need to ask Keat on help for how to clean them up - whether I can put them all in separately named groups or to just leave it as is? As you can see, I combined the separate pieces of the bunny ears, hair, eyes, etc together for easier duplication. I'm not sure if this was a good idea or not...but I could always go back a couple of saved files before I did this so that's all good, too...I've got 50 saved increments and counting...

(So, please, don't let me be wrong...)

Stay tuned for the next epic fail.

Sunday 27 September 2015

3D Model Rigging 02

Week 2 - Day 1

So...I forgot to include the hand joints last time I made the skeleton rig. After I had another look at the photoshop file and some consultation with Keat, I ended up with this...

HAND JOINTS GALORE!
Up close and personal..
I'm not entirely 100% sure I got it right...but, I think it works well enough for what I need for animation. Let's hope it actually works. XD

Here's my outliner!! It's SO MESSY!!!

JOINTS OVERLOAD!!
I think the facial rigging is next...that's going to be FUN...

...

...

I was wrong. We're doing weight painting instead and let me tell you something. IT SUCKS!!!!


Thursday 24 September 2015

3D Model Rigging 01

(Holiday? What is this holiday that you speak of? I know not.)

Week 1 - Day 1 to 4 (Because I completely forgot about blogging until just now?)

This week, our first challenger greeted us with a fist to the face. Not literally, of course. I'm talking metaphorically. It's name is Rigger and it is kicking my metaphorical butt. Keat started us off easy with a demonstration using the cake model where it's a mostly rigid prop and where the only thing that'll be moving at all is the lid where Emelyn will be popping out of. I'm actually not too sure how many joints I'll be needing for it? Whether it's just the two joints on the lids for the up and down motion or whether it needs to be connected to the body as well? I'll need to ask Keat on Monday but I've got a feeling it'll be the latter...which is no big deal because it's hardly a complicated piece of rigging to have in a prop.

Cake Rigging
BUT THE ACTUAL CHARACTER MODEL!! Now, THAT is a different story...

Keat printed out our models so we could draw where we think the joints ought to go in the model so I thought, "oh, this'll be easy". Oh, how I was wrong...so, so, so wrong. 

What I think would happen...
What actually happened...
So, anyway, this rigging/jointing thing is...complicated? Less so than UV texturing and 3D modelling but still a right piece of work. The minimal amount of joints I thought would work in my photoshop trial will NOT ACTUALLY WORK because there's just not enough information to work from. There were the spinal joints to consider, which joint is connected to which to control the bunny ears, the long hair, the long fringe in the front, the extra joint for the butt because why not? And then the arms connected to the shoulder connected to the spine in the middle of the body but not actually from the next like I thought it would - SO MANY PIECES. You can compare my first foray into what I assumed will work and what it actually turned out to be. Whoa, right??

NOTE - Always label and do spring-cleaning, but whatever you do, DO NOT GET RID OF THAT SMOOTH POLYGON OPTION, because you'll always want to be working from a low-poly resolution just to make things easier for yourself. Keat said that you COULD work from a high-poly model but there's a lot of extra edge-loops and a lot of extra information that's...redundant? Unnecessary? Needlessly complicated? Meh...

My second attempt at modelling is a lot better because I kind of know what not to do and I'm actually doing the labeling and cleaning along the way...I'll let you know how well that works when I'm done...and you can laugh as I crash and burn. Yay!

Tuesday 1 September 2015

3D Prop UV Texturing 02

Week 8 - Day 3

I was going to start making my Steve Rogers character model today but Keat told me to make a coffin and then Mikayla told me to stick Steve Rogers in it. WHAAAT!!??

Anyway, I made the coffin (without Steve Rogers in it). Nice and simple, so yay!!

It's empty, I swear!
Here's the video turntable for it. Check it out...


I'm moving on. Or else I'll be asked to start making those pot-plants that go with the scene, too. DX

BYE!

Monday 31 August 2015

3D Prop UV Texturing 01

Week 8 - Day 2

I'VE FINISHED UV TEXTURING MY CAKE!!! AND IT LOOKS GOOD ENOUGH TO SQUASH! LOOK!!!

Bottom tier!
I pretty much just copied and pasted the bottom base and added it on top for the second tier. I'm happy with how it looks in the end. I had a little difficulty adding the smooth feature on some of the trimmings but...meh, it's hardly necessary anyway.

TEXTURED!!
I will add a video of these IN THE NEXT POST!!!

Also, my outliner for the cake is A LOT CLEANER than what I ended up with for the character model. Woohoo!! Less work for me~

(You don't want to look in the groups, though. Because there's a LOT of copy and paste of those teardrops over and over again. It ain't pretty.)

Yayyy!!
I only needed to rename a couple of the groups and that was it. Isn't it lovely? Here is the video for the cake!!!


Anyway, I'm done for the day.

Byeeeeeee~~~

Sunday 30 August 2015

3D Character UV Texturing 04

Week 8 - Day 1

Time to clean up the outliner!! Here's what it looks like before...

WHAAT???!
VERY CONFUSING!! So...after a little bit of spring cleaning, this is what happened...

HUH!??!?!?
It got WORSE!! But fear not! After some more ungrouping, regrouping, renaming and deleting by type => history, it eventually turned out into this...

WOOT!!
Ta-da!!! All nice and cleaned up! I love it when a plan comes together. Here is my video proof!


Toodles! I'm now off to UV texture my prop...wish me luck!

Cheers!

Thursday 27 August 2015

3D Character UV Texturing 03

Week 7 - Day 5

So, I took Keat's advice and scaled down the skin texture and tiled them one on top of the other until they were big enough to fit the entirety of the UV's that needed it...and...it looks better? But eh...

Maybe I'll look back at her in a couple of hours and come to like the new skin texture on her but meh.

I also applied the same method on her hair and it gave pretty much the same look and feel that I got from the other parts of the model...

Maybe I'll take off that blinn from her clothes, but it's supposed to emulate silk...

Ugh...I don't know? It's been a long week, man.

Ta-da,,,
...

(I really miss 2D...)


Byeeeeee~ Have a lovely weekend!

Tuesday 25 August 2015

3D Character UV Texturing 02

Week 7 - Day 3 and 4

I now understand UV texturing a little bit more. (Amazing what difference a day makes.)

Keat used my model for a demo and it made things a lot simpler to understand. With the character being symmetrical I could delete one half of the faces and just work on what's left to UV texture them. Woohoo!! Thank you, Keat!

Texturing with skin and cloth!
I used the extract tool (as shown below) to cut the body into pieces for easier UV texturing. After that it's about Planar Mapping to create a UV on the UV Texture Editor.

EXTRACT TOOL!
All smoothed out~
Furry bunny ears!
This one required me to "cut" a seam along the corners so that the texturing tiling on top of one another isn't too obvious and jarring. You could probably tell from the back of the ears but I'm not going to show this. HAHAHAHAHAHA...

No skin texture!
I got rid of the skin texture because it started to look too realistic and that isn't what I'm after for the final result. But Keat told me to make the texture smaller in photoshop so I could tile them on top of one another and the details of the realistic skin texture isn't tooooooooooo freaky-deaky. I'll try this tomorrow.

I also tried to texture the hair...It did not go too well? I might have to do the same thing Keat asked me to do with the skin so maybe it won't look so weird. Again, I'll do this tomorrow...

Ta-da~~
I just remembered I'd already combined and merged the vertices on the body...which means I'll have to break it into pieces again. AUGGHH!! I HAVE NO FORWARD THINKING!!!!

...

Personally, I like this look. BUT, that might be because I haven't tried the method that Keat suggested. You can see how everything goes in the next post. Tune in next episode!

Dun-dun-duuuunn!!!


CHEERS!

Monday 24 August 2015

3D Character UV Texturing 01

Week 7 - Day 2

UV TEXTURING DOESN'T MAKE SENSE!!!! DFKGJHSKSHDKFHKSHRUI


I'm going to draw a modelsheet for another character to try on Maya. I might as well give it a better shot now that I know what to do and WHAT NOT TO DO.

Wish me luck.

Cheers!

Sunday 23 August 2015

3D Character Model 07

Week 7 - Day 1

I forgot to upload these videos on Friday. WHOOPS! Here are the turntables for the model and prop. WOOHOO!!


Now, onto UV texturing!!! Yay...

Thursday 20 August 2015

3D Character Model 06

Week 6 - Day 5 (Guest Featuring: THE CAKE PROP)

I've finally finished off modelling Emelyn!! HUZZAH!! DKFHDFJKGHDFJK This is what she looks like before and after color!

WOOT!!
WOOT-WOOT!!
I am honestly glad that this part is over. Next time I try this, I'm going to try for something A LOT SIMPLER! At least I kind of what to do for next time, if there is ever a next time. WE SHALL SEE!

Now, moving on to the cake prop! I've colored them in to what I wanted, BUT I ALSO HAD A BIT OF FUN WITH SOME BLUE THROWN IN!
There's one little annoying droplet that's not colored in, but that's because I accidentally stacked two on top. WHOOPS!
AMERICA!
I have now submitted these for marking. DUN-DUN-DUN! This has been a huge learning experience filled with pot-hole after pit-fall and most of it was frustrating and only a quarter of it was actually fun. I almost cried a few times, but that's cool...(not really)...

Next up, RIGGING. YAY(!)


I'm going to work on some 2D stuff now. How I miss it so. DX

Wednesday 19 August 2015

3D Character Model 05

Week 6 - Day 4

I did the hair yesterday but I forgot to post it because I was mostly frustrated and I don't think you'd like to read my thought-processes as I went along the journey of trying to figure out how to do Emelyn's hair. It involved a lot of censored cussing, angry internal-monologues, grunts of displeasure and...yeah, not funny stuff.
Looks weird, man...
I gotta be honest; it looks pretty weird? I reckon I'll need to smooth it out a LOT MORE, but I'll get to it eventually...

I've yet to do the bunny ears and join the hand to the wrist...and I'm hoping to complete this by today. (Fingers crossed.)

ANYWAY! Moving on. (Yes, I'm totally all over the place.)

I tried to do a mirror of the face today and I noticed that a few of the vertices were misaligned and after some googling research and forum jumping, I concluded absolutely nothing. Thanks.

Hamish, however, was able to assist me so HUZZAH!! Now, I shall pass the information onto all of y'all!

We want the "Snap to grid" tool for this!
A "Tool Settings" tab should pop up...

It'll be under the "Move Snap Settings" tab.
Freaky-deaky happenings but it's all good.
Pull it back to the center grid and we're all done!!
NOW, IT'S ALL COMING TOGETHER!!! WOOHOO!!

This is what she looks like...(BRACE YOURSELF!!!)

She totally looks like a hairless alien right now. DX Oh, mah gah...
I need to smooth this all out, too. DX I can't bear to see this!! dfghdfgkddjkfhgjkdfh

SO MUCH BETTER!!
I worked on the bunny ears next and played around with the rotate tool and soft-selection A LOT, which eventually led to these!! I now have BUNNY EARS!! There's nothing like a good copy and paste!

Hoppity hop!
And now, BEHOLD! The culmination of my work for the head...

Alice in Wonderland meets The Little Mermaid?
Now for the hand. DX Watch as I cry in misery trying to figure out how to get rid of the edges on the hand to match with the amount available on the wrist...

ARGH!!
SKDGSKBNKJVJNIUSRUGSDHKFSHKJFHSIURGSRFKJDHFKJDHRKJGHSKHKSH


P.S - I have a new appreciation for 3D movies. I mean, I always have liked them but now EVEN MORE SO.