Monday 31 August 2015

3D Prop UV Texturing 01

Week 8 - Day 2

I'VE FINISHED UV TEXTURING MY CAKE!!! AND IT LOOKS GOOD ENOUGH TO SQUASH! LOOK!!!

Bottom tier!
I pretty much just copied and pasted the bottom base and added it on top for the second tier. I'm happy with how it looks in the end. I had a little difficulty adding the smooth feature on some of the trimmings but...meh, it's hardly necessary anyway.

TEXTURED!!
I will add a video of these IN THE NEXT POST!!!

Also, my outliner for the cake is A LOT CLEANER than what I ended up with for the character model. Woohoo!! Less work for me~

(You don't want to look in the groups, though. Because there's a LOT of copy and paste of those teardrops over and over again. It ain't pretty.)

Yayyy!!
I only needed to rename a couple of the groups and that was it. Isn't it lovely? Here is the video for the cake!!!


Anyway, I'm done for the day.

Byeeeeeee~~~

Sunday 30 August 2015

3D Character UV Texturing 04

Week 8 - Day 1

Time to clean up the outliner!! Here's what it looks like before...

WHAAT???!
VERY CONFUSING!! So...after a little bit of spring cleaning, this is what happened...

HUH!??!?!?
It got WORSE!! But fear not! After some more ungrouping, regrouping, renaming and deleting by type => history, it eventually turned out into this...

WOOT!!
Ta-da!!! All nice and cleaned up! I love it when a plan comes together. Here is my video proof!


Toodles! I'm now off to UV texture my prop...wish me luck!

Cheers!

Thursday 27 August 2015

3D Character UV Texturing 03

Week 7 - Day 5

So, I took Keat's advice and scaled down the skin texture and tiled them one on top of the other until they were big enough to fit the entirety of the UV's that needed it...and...it looks better? But eh...

Maybe I'll look back at her in a couple of hours and come to like the new skin texture on her but meh.

I also applied the same method on her hair and it gave pretty much the same look and feel that I got from the other parts of the model...

Maybe I'll take off that blinn from her clothes, but it's supposed to emulate silk...

Ugh...I don't know? It's been a long week, man.

Ta-da,,,
...

(I really miss 2D...)


Byeeeeee~ Have a lovely weekend!

Tuesday 25 August 2015

3D Character UV Texturing 02

Week 7 - Day 3 and 4

I now understand UV texturing a little bit more. (Amazing what difference a day makes.)

Keat used my model for a demo and it made things a lot simpler to understand. With the character being symmetrical I could delete one half of the faces and just work on what's left to UV texture them. Woohoo!! Thank you, Keat!

Texturing with skin and cloth!
I used the extract tool (as shown below) to cut the body into pieces for easier UV texturing. After that it's about Planar Mapping to create a UV on the UV Texture Editor.

EXTRACT TOOL!
All smoothed out~
Furry bunny ears!
This one required me to "cut" a seam along the corners so that the texturing tiling on top of one another isn't too obvious and jarring. You could probably tell from the back of the ears but I'm not going to show this. HAHAHAHAHAHA...

No skin texture!
I got rid of the skin texture because it started to look too realistic and that isn't what I'm after for the final result. But Keat told me to make the texture smaller in photoshop so I could tile them on top of one another and the details of the realistic skin texture isn't tooooooooooo freaky-deaky. I'll try this tomorrow.

I also tried to texture the hair...It did not go too well? I might have to do the same thing Keat asked me to do with the skin so maybe it won't look so weird. Again, I'll do this tomorrow...

Ta-da~~
I just remembered I'd already combined and merged the vertices on the body...which means I'll have to break it into pieces again. AUGGHH!! I HAVE NO FORWARD THINKING!!!!

...

Personally, I like this look. BUT, that might be because I haven't tried the method that Keat suggested. You can see how everything goes in the next post. Tune in next episode!

Dun-dun-duuuunn!!!


CHEERS!

Monday 24 August 2015

3D Character UV Texturing 01

Week 7 - Day 2

UV TEXTURING DOESN'T MAKE SENSE!!!! DFKGJHSKSHDKFHKSHRUI


I'm going to draw a modelsheet for another character to try on Maya. I might as well give it a better shot now that I know what to do and WHAT NOT TO DO.

Wish me luck.

Cheers!

Sunday 23 August 2015

3D Character Model 07

Week 7 - Day 1

I forgot to upload these videos on Friday. WHOOPS! Here are the turntables for the model and prop. WOOHOO!!


Now, onto UV texturing!!! Yay...

Thursday 20 August 2015

3D Character Model 06

Week 6 - Day 5 (Guest Featuring: THE CAKE PROP)

I've finally finished off modelling Emelyn!! HUZZAH!! DKFHDFJKGHDFJK This is what she looks like before and after color!

WOOT!!
WOOT-WOOT!!
I am honestly glad that this part is over. Next time I try this, I'm going to try for something A LOT SIMPLER! At least I kind of what to do for next time, if there is ever a next time. WE SHALL SEE!

Now, moving on to the cake prop! I've colored them in to what I wanted, BUT I ALSO HAD A BIT OF FUN WITH SOME BLUE THROWN IN!
There's one little annoying droplet that's not colored in, but that's because I accidentally stacked two on top. WHOOPS!
AMERICA!
I have now submitted these for marking. DUN-DUN-DUN! This has been a huge learning experience filled with pot-hole after pit-fall and most of it was frustrating and only a quarter of it was actually fun. I almost cried a few times, but that's cool...(not really)...

Next up, RIGGING. YAY(!)


I'm going to work on some 2D stuff now. How I miss it so. DX

Wednesday 19 August 2015

3D Character Model 05

Week 6 - Day 4

I did the hair yesterday but I forgot to post it because I was mostly frustrated and I don't think you'd like to read my thought-processes as I went along the journey of trying to figure out how to do Emelyn's hair. It involved a lot of censored cussing, angry internal-monologues, grunts of displeasure and...yeah, not funny stuff.
Looks weird, man...
I gotta be honest; it looks pretty weird? I reckon I'll need to smooth it out a LOT MORE, but I'll get to it eventually...

I've yet to do the bunny ears and join the hand to the wrist...and I'm hoping to complete this by today. (Fingers crossed.)

ANYWAY! Moving on. (Yes, I'm totally all over the place.)

I tried to do a mirror of the face today and I noticed that a few of the vertices were misaligned and after some googling research and forum jumping, I concluded absolutely nothing. Thanks.

Hamish, however, was able to assist me so HUZZAH!! Now, I shall pass the information onto all of y'all!

We want the "Snap to grid" tool for this!
A "Tool Settings" tab should pop up...

It'll be under the "Move Snap Settings" tab.
Freaky-deaky happenings but it's all good.
Pull it back to the center grid and we're all done!!
NOW, IT'S ALL COMING TOGETHER!!! WOOHOO!!

This is what she looks like...(BRACE YOURSELF!!!)

She totally looks like a hairless alien right now. DX Oh, mah gah...
I need to smooth this all out, too. DX I can't bear to see this!! dfghdfgkddjkfhgjkdfh

SO MUCH BETTER!!
I worked on the bunny ears next and played around with the rotate tool and soft-selection A LOT, which eventually led to these!! I now have BUNNY EARS!! There's nothing like a good copy and paste!

Hoppity hop!
And now, BEHOLD! The culmination of my work for the head...

Alice in Wonderland meets The Little Mermaid?
Now for the hand. DX Watch as I cry in misery trying to figure out how to get rid of the edges on the hand to match with the amount available on the wrist...

ARGH!!
SKDGSKBNKJVJNIUSRUGSDHKFSHKJFHSIURGSRFKJDHFKJDHRKJGHSKHKSH


P.S - I have a new appreciation for 3D movies. I mean, I always have liked them but now EVEN MORE SO.

Monday 17 August 2015

3D Character Model 04

Week 6 - Day 2

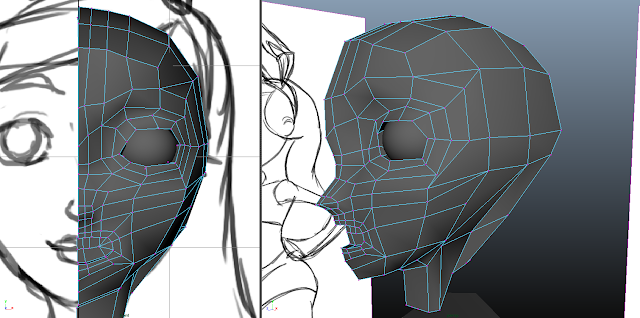
FACES ARE NASTY HARD!! I should've given Emelyn a mask. DX UGHHSDKJFHSKHEUI!

WHAT THE EFF...
I stopped following the tutorial because it started to get REAL COMPLICATED with all the edge loops and it didn't help that they kind didn't fill in some gaps in-between each step so I ended up second-guessing a lot of things and...yeah, not cool.

I asked Oscar to help me with the eyes because I was struggling with it (I have a headache now) and it's not fun...

Also, Emelyn's no longer lovely. She looks like a friggin' ALIEN!! Which should be quite fitting considering the movie I originally took the idea from BUT THAT WASN'T ON PURPOSE! SDFJHSDFHSKDJFHSD

That mouth is freaking me out, too.
I'm so over this.
I'm moving onto the hands now, because if I don't, then I'm SCREWED!!! DFGKLJDLFKGJDFLJ Adrian helped me with the starting shape of the hand. I'm hoping that I'll be done with it by the end of the day tomorrow...then I can work on the hair...

Oh, mah, gah. I really do not like this. I have nothing against 3D modelling because it's cool as heck, but I am not made for this. I AM NOT MADE FOR THIS.

IS THIS ENOUGH?! ARE YOU NOT ENTERTAINED?!??! Because I sure as heck ain't and I'm slowly nursing a headache and it's so not fun...

Gotta hand it to ya, though, it's a lot harder than it looks.
I'll refine these tomorrow with a fresh set of eyes. And maybe ask Keat whether it's good enough or if he'd prefer more detail. (For the love of all that is good and true, please say no need.)

I swear I will finish this by Thursday, because I still need to do the prop turntable with textures and that sounds horrifyin'. I got chills, they're multiplyin'. And I'm losin' self-respect...


-SOBS-

Sunday 16 August 2015

3D Character Model 03

Week 6 - Day 1

I barely did anything last week. DX I was more focused on trying to do the presentation than work on my 3D modelling, BUT!! I'm mostly done with my search and I just need to do some fine-tuning and that should be it? We'll see how everything goes on Friday.

NOW! 3D MODELLING!!

With Adrian's help, she got the shoulder to connect to the arm! HUZZAH!! And I was able to figure out how to join the top half to the bottom half and also connect the neck!! OH, MAH GAH! HERE, HAVE SOME PICTURES!

I also straightened out Emelyn's legs to a better "A" shape. Woohoo~!

She's no longer armless!!
The top half connected to the bottom half!
AND! She's looking pretty snazzy when you hit 3! Ugh! I'm so happy. D'X (crying tears of joy) But I still find 3D hard and would prefer a pencil and paper over this any day...

I made a bet with Mikayla that if, SOMEHOW, I change my mind by the end of this term, I'll either pay her 5 BUCKS or a cup of coffee. (She's not allowed coffee except on Friday and Saturday...)

Isn't she lovely, isn't she wonderful.
I still have her hands, face and hair to do. DX Oh mah gah, such dread! Much scared.

I made some head-way (GET IT?!) into doing the face but the tutorial I'm using has some steps in it that have HUGE GAPS in-between that I found EXTREMELY HARD to make heads or tails about? USKGJSHDFKJHSHFKSCJH I am CONFUSED. I don't know how to extrude the neck from the head so...I'm gonna call it a day and see if I can continue on from there tomorrow...
HEAD'S UP!

CHEERS!

Tuesday 11 August 2015

3D Character Model 02

Week 5 - Day 3

Today...I added the neck, finished off the feet and added an arm. I have yet to attached any of the pieces together into ONE ACTUAL BODY but I'll do that whenever instead. I also need to add in the hand, which is going to be fun(!).

Yay, modelling...
The arm looks weird...I'll fix that later...

...

UGH! I JUST REMEMBER ABOUT THE HAIR!!! KSDFJGHSKJHGKSHJH

I'm not looking forward to that...


Blurgh...

Monday 10 August 2015

3D Character Model 01

Week 5 - Day 1

WHAT IS THIS HORROR THAT IS A 3D MODELLING PROGRAM?! I thought I understood how to make STUFF but I was WRONG because all the cake needed was a few polygons smooshed together to make it whole but Emelyn is WORSE!! DKHSDKHSKDGHUIRIHVKH

I don't wike it.

Today, all I did was remake my modelsheet, as you can see below.
Emelyn V2.0
It ain't much, but it's all I got. Some obvious inconsistencies, but I figured I'll work it all out in the 3D modelling...?

Week 5 - Day 2

Keat used my character modelsheet to demo on how to do some 3D modelling. OH MAH GAH, THAT MAKES A BIT MORE SENSE THAN ME TRYING AND FAILING TO SEARCH UP TUTORIALS ONLINE ONLY TO GET A WEB FILTER VIOLATION, WHAT!

This was my first attempt at making a model. As you can see, it ain't much, and I ain't keeping it.

Attempt 01
BEHOLD, A BETTER VERSION OF THE MODEL!! It's still missing a neck and a pair of feet, but I'll work on it tomorrow...and maybe merge/stitch them together after it's all finished and see how it all adds up? We'll (slowly) get there...

Attempt 02
I actually don't know where that weird looking slab in between the top half and the bottom half came from but I'll be deleting those faces to merge the two halves together tomorrow. I WILL BE NAMED FRANKENSTEIN!!!

...

I haven't even done the textures for the prop yet, either. DX I should do that before this week ends...


P.S - If Keat hadn't rescued me with that demo I think I would've stressed to the point of tears. I will fully admit this without (too much) shame.


Bye...

Thursday 6 August 2015

3D Model Prop 03

 Week 4 - Day 5

There are two things I need to address: NUMERO UNO. Duplicating the second tier of the cake without ruining it!! I tried using meshing/union to do this and it just made a weird hole where the teardrops on the side of the cake were and it looked like a horrible BLACK HOLE OF DOOM. So no. BUT LOOK AT IT ANYWAY!

WHAT IS THIS MONSTROSITY!!?
Ugh. Much ugly. Such bad.

NUMERO DOS. Cake lid? The one where Emlyn will be jumping out of? Yeah, I need to see Keat on how to do this. OR SOMEONE! Will come back to this later. After I find someone (ANYONE) to help me on duplicating the second tier without a repeat of the above performance. No need for an encore, thanks.

...

Okay, there are actually THREE THINGS I need to address: NUMERO TRES. Tidying up the outliner. Because it is messy as heck and I don't even know what 3/4 of them are? And it's horrible to look at! I kept my layers are nice and neat but the outliner!! DX OH, FOR SHAME!!!

!??!?!?
This would probably be a 3D programmer's worst nightmare?? Because nothing's labelled properly and I didn't realize how bad it was because I only paid attention to the layers and by the time I noticed the funky thing that was happening in the outliner it was already pretty messed up...

BUT! FEAR NOT! Ben has cometh to rescue us from our plight.

Here are some handy, dandy tips on how to get the second tier of the cake without it looking like a poor pinata smashed beyond recognition.

CTRL + G (GROUPING) Handy for putting all the components into the cake TOGETHERRRR!!! Meshing/union DOES NOT WORK at this point.

CTRL + D (DUPLICATE)

W (MOVE)

DOUBLE CAKE!
Huzzah!! Now, all that's left is to resize it, add a lid, throw on some wheels at the bottom and we've got ourselves a sweet ride!!

(Get it???)

And!! Ben also helped me sort out the outliner!! DO YOU HAVE TOO MANY GROUPS AND NO CLUE WHAT TO DO WITH THEM??? Delete history. EDIT => DELETE BY TYPE => HISTORY (This gets rid of all the inputs. Extra fiddly bits we don't need or don't know leads to what.)

I can see clearly now the crap is gone~
Isn't that glorious?

Now, unfortunately for me, I lost the wheel layer that was supposed to go under the cake BUT THANK GOODNESS FOR INCREMENT SAVING!! Because I found it in the previous version. Now, comes the question of HOW I'll get it from the old version into the new version. I'm sure there must be a way to do this but I'll have to ask someone to help me with this again. DX

TAKE THE WHEEL!
I don't know. It looks good enough for me, I guess? I mean, you won't even see it from under the cake anyway? Blagh...

ALSO! I figured out how to bring the wheel in from the old to the new. THANK YOU, COPY AND PASTE FUNCTION!! DKFHDKFJGHDOFVHEJROJIOJ


Some three hours later...

I HAVE A LID!!! But don't ask me how it's done because Ben did all the work for me and as much as I was paying attention, I wouldn't be able to recall ANY OF IT or do a repeat. JKSHDKJHSFKS

It's got wheels, too!!

P.S - I'm in the mood for sandwiches...

P.P.S - And sleeeeeep...

Over and out.

Wednesday 5 August 2015

3D Model Prop 02

 Week 4 - Day 4 (TORTUROUS WEEK!!!)

Being sick is horrible. And confusing. It is horribly confusing!! Like, that Katy Perry song. Am I hot, or cold? Hungry or no? Blankets or not? SJDKFHKSJHDCKSHKDFHS

Anyway, I made a cake. It was hard. I don't know if I like 3D yet, but we'll eventually figure out where I stand on it. HAVE A LOOK.
LET US EAT ANOTHER CAKE!!
I haven't added the wheels on the bottom yet. I'll need three of those. And also the top tier of the cake but that's probably something an easy copy and paste can do for me. YAY!!

...I'll work on the wheels on Friday...hopefully that won't take too long...?

It is 2.45pm on a Thursday and I am officially done for the day. I no longer have the head space nor the capacity to continue working on this Maya program. 


P.S - Being sick SUCKS. My head feels like it wants to float away, which is both weird and disturbing.

P.P.S - I actually wouldn't mind a cake right about now?? A nice taro cake will be nice...

P.P.P.S - Maybe I'll make my cake a pale purple...


Byyyeeeeeeeee...~

Sunday 2 August 2015

3D Model Prop 01

 Week 4 - Day 1

I AM SICK. And I only just managed to make the basic shape of the cake prop with lots of help from Keat and Hamish. Thanks, Hamish; I won't sing the Lava song to your face this week.

This is the culmination of the day's work...

LET US EAT CAKE!!
Bro...I know it doesn't look like much. That's because, it probably isn't. BUT JUST YOU WAIT UNTIL I GET BETTER! Then I can try and wow you with my awesome (non-existent) 3D programming skills and add the trimming on the cake. It's going to be great!! Or a great disaster. One or the other.

It'll be great, either way.

Cheers!